

Techniques Coiling
COILING
“Turning the sketchbook into clay.” – A Teacher’s/Student’s viewpoint.
COILING
__
In the classroom one of the most basic techniques used to build a structure out of clay is coiling. The technique is as old as time itself but like all simple solutions, it endures. A coil piece can be made using very few specialist resources with the exception of clay of course. There are several aspects of this technique that need to be mastered to gain complete control but once that has happened, watch them fly!
• Roll an even coil
• Adding a coil to the base
• Make the coil into a ring
• Building with coils to control and develop a form
• Refining a form using a kidney (credit card)
Making the base
If I am working with a class I will often make two or three large slabs and cut them up to make enough for the class. If you are a purist educator maybe students should roll a small slab each though you could be surprised to find how much of your lesson you will lose in doing this.
The simple way to make the circular base is to use a water pot/yoghurt pot/anything round to push gently into the surface of the slab. Then use a potter’s knife to cut the circle.
If you have banding wheels (whirlers) you could try the traditional way, students love to see this happen. Place the slab on the wheel and spin it as fast as you can. Allow the point of the knife to rest in the clay and keep it completely still. A line will form as a circle on the slab which can be cut through to make your base. The position of the knife is critical (at right angles to an imaginary vertical line running through the centre at quarter past three). It takes a bit of practice!
Rolling an even coil
This should be straight forward enough should it not? Yet no matter how many times this is explained, the same mistakes occur. The easiest way to make a coil is to buy an extruder with a dye approximately 2cm in diameter and make them ready to use by the box full. However this costs money and is not always possible.
This makes the parents of teenagers worried about their safety and also ensures that the drug is completely safe for use. purchase levitra online http://deeprootsmag.org/category/departments/native-american-news/?feedsort=rand
To roll a coil by hand it is important to treat the clay in the right way. When cut from the bag make the piece of clay into a large sausage shape that the fingers can wrap around. Do not allow students to sit playing with the clay in the palm of their hands as it will dry the clay quite quickly making the rolling almost impossible as the clay will fragment.
The students must be stood with their head over the clay and begin rolling with some pressure on it. The clay must roll from the tips of the fingers to beyond the ball of the hand (almost to the wrist). This ensures that the coil makes a complete rotation, allowing it to roll evenly. As the coil becomes more narrow the downward pressure needs to be relaxed and the hands to move laterally along the coil to gain even width. The coil will develop thin spots and even break if the hands roll in the same place all the time.
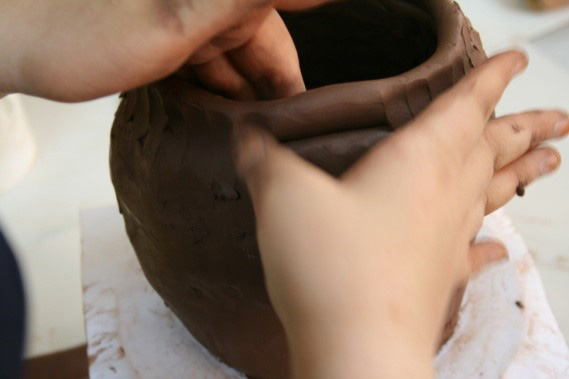
Coiling: Practically Speaking…..
For a number of reasons building a form is something that cannot be achieved in one sitting, particularly within the confines of a school day. Practically this is not an ideal situation but it is unfortunately reality so we have to work around it. Therefore it is important that a student first of all understands the importance of how their piece should be left in order for it to be ready to work on next time. Secondly they should understand that their piece is a commitment of several blocks of time that they must follow through both in lessons as well as extra curricular time.
Leaving work open during the day is sometimes a way to achieve the desired consistency to build on to, though it is important for the student to check the piece at regular intervals to make sure drying does not go too far, at the end of the day it must be wrapped tightly in plastic bags to maintain consistency for the next session. It would be better to also store in a damp cupboard though this is not always possible with large volumes of work therefore the wrapping becomes more critical. A more risky approach is to wrap bags loosely around the piece and leave over night though if too much air gets to the piece the clay can be too dry to work on. There are many variables when drying clay in terms of room temperature and atmosphere so a little experimenting is recommended!
In fact the small time slots can suit the building of a large, multi-faceted piece (such as figure 3, in the Form blog). Building a large scale piece in one session can easily end in disaster, where soft clay at the base is unable to support the increasing weight above.
Some controlled drying at each stage can solve the collapsing problem as the slightly drier clay will support almost anything that is put on to it provided it is attached properly. It is therefore important to instil in students the responsibility to store their work appropriately in between sessions so that the clay is in the best possible state to continue.

The issue of drying can also cause other problems as the piece progresses. The first few coils of each session should be scored and wet thoroughly at least two or three inches down the form to allow new clay to bond to the dryer existing form. Making the joints as strong as possible is particularly important where varied levels of shrinkage could occur.
About Shrinkage
• Clay shrinks as it loses its moisture content.
• For a general purpose clay this could be around 10%
• The higher temperature firing, the more shrinkage occurs
• Leather hard clay has already started to shrink significantly. Attaching wet clay to clay at leather hard stage can easily result in cracking when the piece becomes bone dry or in firing because the wet clay has shrunk more, putting pressure on the joint.
• To determine how much shrinkage might occur with your clay, make a tile and measure it at all stages of process.
• To prevent shrinkage whilst building, spray the top of the piece and cover tightly with polythene.
About author


Add comment
You must be logged in to post a comment.